Searching4Zen

Culinary

Cooking with a wood burning oven

No Comments

We have installed and use the wood burning oven from Le Panyol, located at 2 Route de Larnage 26600 Tain L’Hermitage, France – +33 (0)4 75 08 96 50. These recommendations are based one my experiences of using both the Le Panyol and the Mugnaini wood burning ovens.

A Le Panyol oven is quick and economical to heat.

It takes 4 to 8 kg (8 ½ to 17 ½ pounds) of wood to reach a temperature close to 400°C in approximately 1hr30 of combustion.

The shape of the dome and the size of the opening mean that the air penetrates the lower part of the entrance and circulates naturally to provide perfect combustion while the smoke is evacuated via the upper part and the hood.

The heat is accumulated in the large volume of heat-resistant terracotta and the output is maximized by the shape and thickness of the parts.

Once up to temperature, the Le Panyol oven restores the accumulated heat very slowly by radiation.

Firing Procedures

Properly firing your oven will be the single most important step towards your cooking success. No matter how great a chef you are or how delicious your recipes are; if you don’t fully heat your oven it will cause a fluctuation in temperature that will show up as inconsistencies in cooking your menu items.

Spend the hour or hour and a half and fully saturate the oven floor and crown elements with heat and establish a bed of coals. After that you will adjust the flame pattern (by adding more or less wood) to regulate and maintain your oven temperature.

Tools and technique: By obtaining the recommended tools and following the firing procedure for your Le Panyol you are sure to have proper balanced heat for hours of cooking and entertaining enjoyment.

Step One: THE CENTER BURN (about 20 minutes)

Objective: to establish a large bed of coals, which will then ignite all the hardwood going forward.

1. Remove oven door and leave it off for the duration of the firing procedure. Start in the front center of the oven within arms reach. Place two to three firestarter cubes lengthwise on the oven floor spaced between two substantial (approximately 1.25” x 2” x 16″) pieces of kindling. The kindling needs to be large enough to elevate the wood pile, allowing for oxygen to reach the fire. Use small logs if necessary. Place three substantial pieces of kindling across, perpendicular to the first two pieces of kindling.

2. Place two small hardwood logs across, perpendicular to, the three pieces of kindling and top with one or two more small hardwood logs, depending on the size of your oven. Use this crossing pattern so that the air can circulate through the wood.

3. Light the firestarters with a match, the kindling will begin to ignite.

4. Place one piece of kindling across the front of the wood pile and with your long handled utility hook or metal peel push the entire pile into the middle of the oven floor. The fire should be just back of the center of the oven.

Within 8-10 minutes you should see large flames burning straight up hitting the ceiling of the oven. The flames should hit the top of the dome and cascade to the sides. If the flames are being pulled forward by the flue push the fire back another 1-2 inches.

NOTE: this flame position is important because flames being pulled towards the front of the oven means heat is being lost up the chimney pipe and not be absorbed into the oven components and it will take you much longer to heat your oven. If the fire is not burning well after 8-10 minutes add a few more pieces of kindling or very small logs. Resist the urge to load this initial fire with more large logs, as you do not yet have a coal bed to ignite the hard wood. The larger wood will not ignite and subsequently smolder and produce smoke.

5. Maintain the fire, checking it frequently and add more kindling or small logs to keep the flames hitting the ceiling. You will need to continue burning the fire in this manner until you see a 6-8” white spot on the dome above the fire. This will be your indicator to move onto the next step.

Step Two: THE PERIMETER BURN (30–45 minutes)

Objective: to preheat the cooking side of the oven

1. At this point you need to decide which side of the oven you will eventually cook on, either right or left side, and focus on heating this side first. (Do not worry about heating the opposite side as it will heat up quickly once all the coals are banked).

2. Using your long handle metal peel or the ash scraper, push the coals from the center of the oven to the perimeter of the cooking side of the oven, about 3-5 inches from the walls of the dome. (It is important to leave a little space between the fire and the walls so you do not suffocate the fire). The final goal is to line 2/3 of the oven perimeter with coals. Leave the center of the oven open and clear.

3. Add kindling and more logs to the fire along the perimeter. Most ovens will require 3-4 pieces of wood to cover the 2/3 of the oven’s perimeter. Elevate the logs by leaning them on each other to overlap to ensure plenty of airflow. You may however need to add another fire starter if you loose the flames.

4. Within a few minutes the logs in the perimeter burn should ignite and burn well with flames rolling up and filling the dome. Keep this large preheat flame burning well (you may need to add more kindling and logs) until you have burned the black carbon off of the dome on that side of the oven. The opposite side of the oven will remain black for now.

DO NOT OVER FIRE THE OVEN. IF FLAMES ARE REACHING THE OVEN FLUE (RIGHT BEHIND THE ARCH) YOU ARE OVER FIRING THE OVEN. Put the door on to dampen the flame and back off quantity of wood used.

“Le Panyol” tip: Pyrolysis is complete when the whole inside of the oven has turned white.
At this point the oven has built up enough energy for several hours of cooking.

Step Three: BANKING THE FIRE (10 minutes)

Objective: to position the fire for cooking

I recommend banking the fire to the side of the oven—about one arms length in from the opening—not to the back of the oven. Remember, wherever you place this hot bed of coals that will be the hottest part of the oven and the food will cook in relation to this. It is easier to see and manage the cooking, especially pizza with the fire on the side. If you bank the fire to the back of the oven the food will brown to the rear, which is difficult to see and quickly manage.

1. Using your long handled metal peel of ash scraper push all of the coals to the opposite side of the oven. (Do not use your floor brush to move the live coals and logs as you will burn the wooden backing and melt the brash bristles). Add additional wood to maintain the preheat flame and burn the remaining black carbon off of the dome.

2. Use the floor brush to sweep any ash from the cooking floor into the fire. Be sure to sweep well around the oven perimeter and towards the front arch opening.

Congratulations…you are now ready to start cooking!

A well-preheated oven should have a dome void of black, a bed of coals and one to two logs burning. Remember to add wood during cooking as the flame will maintain your deck temperature – more wood/large fame to maintain the pizza environment, moderate amount of wood/vertical flame to maintain the roasting environment.

For more information about the Le Panyol ovens, click here.

Starting the fire using the first step of building a fire.

During this stage you will establish a large bed of coals over a 20 minute period.

How to Make a Custardy French Omelet

No Comments

A very good tutorial on how to make a perfect French omelet. I struggle with this and have found that this tutorial is very helpful. The only part I do not like is that it is imperative that you use a non-stick pan, but I hate the thought of have such a pan in our kitchen.

Click to read the article at Bon Appétit.

Instructions

  1. Use the freshest eggs you can find. If you’re buying eggs from the farmers’ market, ask your farmer for large ones.
  2. For an evenly cooked omelet, you need smooth eggs. So take a whisk to ’em and incorporate the whites and yolks until you’re left with an even mixture with no white strands or pieces of yolk floating around. (You’re not trying to whip the eggs, you’re just trying to incorporate all the disparate bits.) If you’re not sure if your eggs are fully mixed, lift your whisk up in the air. If the eggs fall back into the bowl in a smooth, uniform stream, they’re ready.
  3. Use a nonstick pan. Nothing is more important to achieving the perfect roll than using a nonstick pan.
  4. Start your pan on medium to medium-low heat. When you add butter to the pan, it shouldn’t make a sound (that means no immediate sizzling or foaming.) Instead, you want the butter to gently melt into the skillet. When you start to see a few little butter bubbles, add the eggs. Again, you shouldn’t hear anything when the eggs hit the pan.
  5. Make sure to season in the pan. Season the omelet mixture with kosher salt and black pepper right in the skillet as they begin to cook. And now, it’s time to stir.
  6. This is the key moment when egg becomes omelet. Start stirring your eggs as soon as you add them to the pan to make sure nothing is sticking to the bottom. Stirring also helps to prevent curds of cooked egg from forming faster than it takes the entire mixture to cook. To further ensure the eggs cook evenly, vigorously shake the pan in a circular motion as you stir. Every so often, scrape down the sides of the pan to make sure no bits of egg overcook. One last note about this step: It will probably take longer than you want it to. Just remember, it’s a marathon, not a sprint—your patience will be rewarded.
  7. Remember what we said about this being a marathon? Exert one final push of patience and let your soon-to-be-omelet sit, off the heat, for one minute. This will help the bottom of the omelet finish cooking (translation: easier rolling) without running the risk of overcooking the whole caboodle.
  8. Holding the skillet handle in your left hand at a slight angle, tilt the pan away from you and gently begin coaxing your omelet into a roll. Once you’ve made your first roll, add a pat of butter to the skillet to help loosen it up the rest of the way.
  9. While you’re rolling, go for about 1″ intervals, as opposed to a tight cigar-style roll. Once the omelet is rolled and all the way at the other end of the pan, tip the pan over onto the center of a plate, using your spatula to help you get the omelet to sit seam side down.
  10. You thought we were done with butter here? Oh. Oh, no. Give your perfectly plated omelet a final rub with a pat of butter to give it a glossy sheen. Finish with a sprinkle of fleur de sel and finely chopped fresh chives. Take a moment to admire. Eat!

This is our step-by-step recipe for the classic French omelet, but in Ludo’s version, he fills it with a bit of Boursin cheese, a totally delicious and acceptable addition. You can get that (almost identical) recipe here: Ludo Lefebvre’s Omelet.

Sainte-Foy-de-Grande Samedi Marché

No Comments

Our first day in the Sainte Foy Bordeaux appellation and we decided to head off to the Saturday market. The marché in Sainte-Foy-de-Grande is extensive, full of people and had many vendors that we do not get in the marchés in the Dordogne.

Not only was there extensive produce and fruits available, but there was excellent fish, meats, sausages, and my favorite dried fruits stuffed with foie gras. These little delicacies were so tasty and sweet, it was like candy from heaven.

Bottom line if you are visiting the Sainte Foy Bordeaux appellation, you must make time to go to the Saturday market in Sainte-Foy-de-Grande.

The dried fig stuffed with foie gras and the prune stuffed with foie gras.

The dried fig stuffed with foie gras and the prune stuffed with foie gras.

Fresh Mussels

Yummy looking mussels.

Here is a mixture of the dried figs stuffed with foie gras as well as some prunes stuffed with foie gras. We have both for tonight.

The highlight of the day, these dried figs were filled with foie gras. Such unbelievable flavor!

A French speciality, Radis Noir. I just can’t get my head around eating a black radish.

We just could not make up our minds on what we wanted to prepare and eat tonight.

Oh the prunes were so good at the marché

Yummy garlic, shallots and onions.

Very interesting way to present and sell Endive. The plant was still attached to the roots in a holder with some dirt. The vendor just broke off the vegitable when you bought it.

The marché at Sainte-Foy-de-Grande is extensive and almost every street has at least a couple of vendors. However we found one that was still empty.

The oranges were looking so fresh and tasty today.

Giuseppe Giusti aceto balsamico

No Comments

We have been buying aceto balsamico from Guiseppe Giusti for many years but this is the first time we actually got to stop in to see how the balsamico is actually produced and to learn more about the history of this firm.

The tour was first rate and we got to taste many different versions of the aceto balsamico from the top of the line 25 year aged produce to the younger versions that are not sold as the traditional aceto balsamico.

Definitely worth a stop to explore.

Giuseppe Giusti aceto balsamico

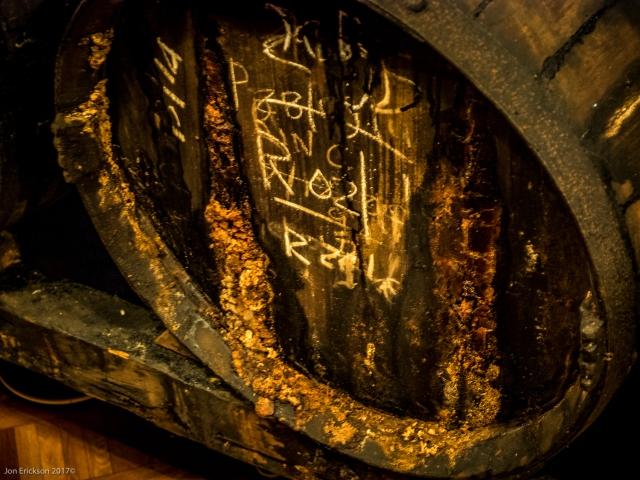
When one cask starts leaking they do not remove it, instead they build a new cask around the old one. They do not want to lose all flavor that has built up over the many years of production.

Giuseppe Giusti aceto balsamico

Various casks for the production of aceto balsamico. They are never retired, they just keep getting enhanced with more flavor.

Giuseppe Giusti aceto balsamico

Tools of the Master

Giuseppe Giusti aceto balsamico

Various metals awarded for the aceto balsamico from Guiseppe Giusti.

Giuseppe Giusti aceto balsamico

One of the original casks which dates back to the 1700s.

Giuseppe Giusti aceto balsamico

A mixture of the products offered by Giuseppe Giusti.

Mercato Albinelli

No Comments

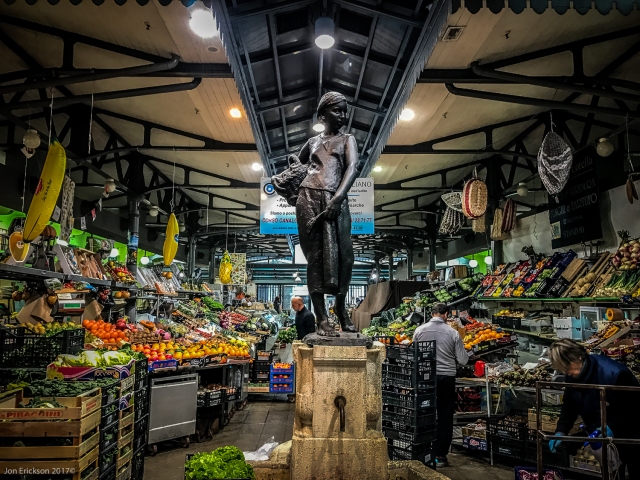
During our stay in Modena Italy, we stopped into Mercato Albinelli to do some culinary shopping. We had spent the morning visiting some balsamic producers. When we arrived at the Mercato Albinelli were blown away with the architecture, the quality of the products and just about everything else about the Meercato Albinelli. My only regret is that we did not get there in the morning and came in as the venders were starting to close up shop. Morale of this store is to visit the mercato early in the day and leave yourself at least two hours.

Mercato Albinelli

The entrance to the Mercato Albinelli

Mercato Albinelli

Inside the beautiful Mercato.

Mercato Albinelli

One image of the many wonderful vendors at the Mercato.

Mercato Albinelli

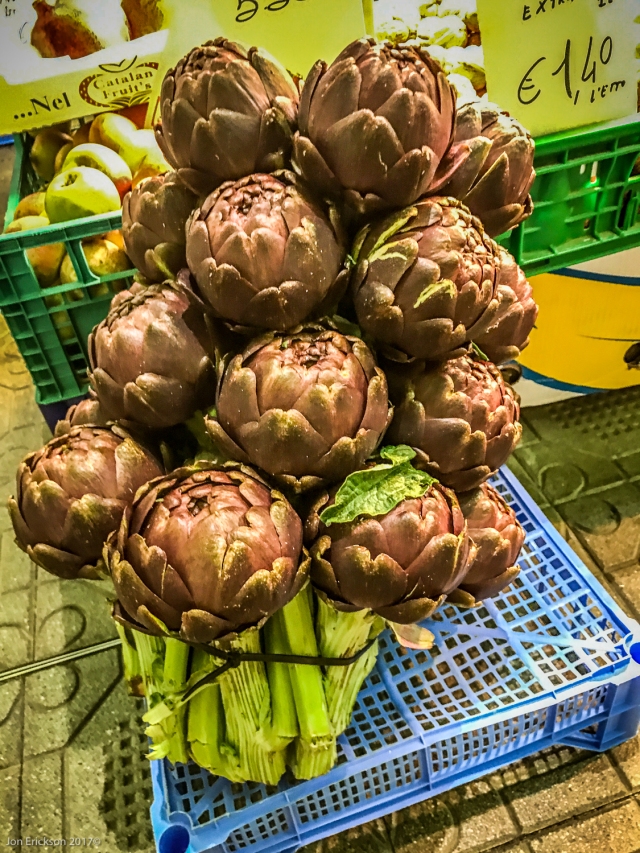
Beautiful topinambour

Real Food/Fake Food: Why You Don’t Know What You’re Eating and What You Can Do About It

No Comments

I just finished reading an outstanding book that makes me want to puke about how the residents of the US are fed such crappy and unhealthy food. There is no oversight and it all seems like the large food providers have no problems in selling to consumers food that not only does not taste good, is not nutritious but in some cases down right unhealthy for you to eat. I strongly recommend that you buy the book and read it, it opened my eyes more than they already were. You can find it on Amazon.

One thing that you can do is to find real foods that are protected by Protected Designation of Origin, which certifies that the production of the food occurred

Here are the Acronyms to Know from the appendix of the book “Real Food/Fake Food”.

AOC: France has the most elaborate system for grading the quality of place-based production of food and wine products. The Appellation d’Origine Contrôlée (Controlled Designation of Origin) indicates that products with this seal were made in places known for making it well, such as Roquefort cheese from Roquefort or Charade from Champagne.

AVAs: American Viticultural Areas are regions legally designated as producing high-quality grapes in the United States, and wines made mostly of grapes from those regions can carry the AVA designation and the name of the particular AVA on their label. An example would be Pass Rubles, California.

BAP: The Glolal Aquaculture Alliance’s Best Aquaculture Practices is considered the best national third-party certifying body for the quality of farmed fish.

COOC CERTIFIED EXTRA VIRGIN: The California Olive Oil Council offers use of this label to producers in the state using California grown olives and meeting higher testing standards for extra-virgin olive oil than those used by the United States and European Union.

DOCG: Denominezione di Origine Controllata e Garantita (Controlled Designation of Origin Guaranteed) is the highest of three grades given by the Italian government to its country’s best-quality wines (many lesser wines receive no designation at all). It indicates that the wine was made under strict roles governing allowable grape varietals, aging, and so on and that the wine uses only grapes from a particular area whose vineyards have been designated as excellent. The next two grades ere DOC Denominazione di Origine Controllata, or Controlled Designation of Origin) and DO (Denominazione di Origine, or Designation of Origin).

DOOR: The Database of Origin and Registration is a searchable online database of all fourteen-hundred-plus products either awarded or under review fur PDO, PGI, or TGI status. See GIs.

EVA: The Extra Virgin Alliance offers use of this label term to producers worldwide whose oils meet higher testing standards for extra-virgin olive nil than those used by the United States and European Union.

EVOO: Common shorthand fur Extra Virgin Olive Oil, the higher of two grades for virgin olive oils.

GIs: Geographic indications is the catch-all term for foods from anywhere in the world whose very names include a specific place and assure a level of quality. An example would be Prosciutto di Parma, protected under both U.S. and EU law as a particular type of ham made under strict regulations and quality control only in Italy’s Parma region. The European Union has adopted a three-tiered grading system for GIs from all around the world, not just Europe. These terms, each with a specific seal/logo, can appear on foods to designate higher quality.

PDO. Protected Designation of Origin is the highest grade and certifies that production of the food occurred in a particular place and with an exceptional level of quality.

PGI; Protected Geographic Indication is the second tier of the EU system for grading outstanding geographically indicated products. It guarantees the product was made in a particular place well known for producing that product in a notable way.

TGI: Traditional Specialties Guaranteed is the third tier of the EU system for grading outstanding geographically indicated products. It designates the food was made in a manner considered traditional, and must have been made and sold in this way for a minimum of 3o years.

IOC: The International Olive Council is the main regulatory body of olive oil in the world, setting the standards and definitions used in Europe, the United States, and most other places.

MSC: The Marine Stewardship Council is considered the best national third-party certifying body for the accuracy of wild-caught fish. Its logo on food labels is a blue fish in the shape of a check mark.

OLIVE OIL GRADES: All virgin olive oil must be entirely from the mechanical crushing or spinning of whole olives, nothing else. There are just two edible grades, extra virgin, which meets a number of laboratory and sensory testing standards, and virgin, which scores lower on these tests (though, in practice, both labels ere widely misused). Below the virgin grades is simply olive oil, which has been chemically refined and/or distilled to remove impurities and may also contain oil from non-whole-olive by-products. While fit for human consumption, olive oil is considered inferior to virgin olive oils for purposes of both taste and health. Light olive oil falls under this category, as does most oil labeled as “premium,” “super,” “blend,” or “pure.”

UNAPPOL/100% QUALITA ITALIANA: UNAPROL is a trade association of Italian olive growers who make oil from their own domestically grown olives (most olive oil from Italy is made with oils imported from other countries). Its label for extra-virgin olive oil, “1oo% Quatita Italiana,” certifies that all the olives used were grown in Italy and that the grading standards are higher than those required under Italian law or those used by the United States or European Union.

USDA BEEF GRADES: All beef sold to consumers in the United States can carry one (or none) of three grading claims reflecting its quality. USDA inspectors inspect each carcass and assign it a grade. The highest is USDA Prime, followed by USDA Choice, then USDA Select, while some beef does not carry any grade designation. USDA Prime represents about 2 percent of the beef sold in the country. Ungraded beef is typically of lower quality than USDA Select, but some small farmers opt out of grading altogether because of the cost, while others may do so because for some styles of beef production, such as grass-fed or exotic breeds, USDA grading may not accurately reflect quality.

Cooking Fats 101: What’s a Smoke Point and Why Does it Matter?

No Comments

Great article from Serious Eats (ok so it is two years old).

Type of Fat Smoke Point Neutral?*
Safflower Oil 510°F/265°C Yes
Rice Bran Oil 490°F/260°C Yes
Light/Refined Olive Oil 465°F/240°C Yes
Soybean Oil 450°F/230°C Yes
Peanut Oil 450°F/230°C Yes
Clarified Butter 450°F/230°C No
Corn Oil 450°F/230°C Yes
Sunflower Oil 440°F/225°C Yes
Vegetable Oil 400-450°F/205-230°C Yes
Beef Tallow 400°F/250°C No
Canola Oil 400°F/205°C Yes
Grapeseed Oil 390°F/195°C Yes
Lard 370°F/185°C No
Avocado Oil (Virgin) 375-400°F/190-205°C No
Chicken Fat (Schmaltz) 375°F/190°C No
Duck Fat 375°F/190°C No
Vegetable Shortening 360°F/180°C Yes
Sesame Oil 350-410°F/175-210°C No
Butter 350°F/175°C No
Coconut Oil 350°F/175°C No
Extra-Virgin Olive Oil 325-375°F/165-190°C No

*All neutral oils listed on this chart are refined; though unrefined versions of them do exist, these are the varieties most common to a home cook’s repertoire. Meanwhile, the majority of flavorful oils are expeller-pressed and, though available refined, are often quite costly and uncommon.

Beauty Can Be Bland But Chocolate and Vanilla Ice Cream Always Saves The Day

No Comments

Yesterday we set out to make this wonderful looking open faced lasagna with melted cheese and sliced asparagus, all topped with an asparagus salad. The finished plate is shown below.

The assembled meal, looks beautiful but tasted bland

The assembled meal, looks beautiful but tasted bland

First we made pasta for the lasagna sheets by hand, which is something I find so peaceful to make. The nice thing is that we only needed six sheets so we were able to make enough other pasta that it will last us a week or two.

Then we moved on to slicing the parmesan and the asparagus.

Shaved Asparagus and Parmesan

Shaved Asparagus and Parmesan

While I was doing the above, Jo Ann was making the asparagus salad that will top the lasagna as well as buttering the cookie sheet we will bake them on.

Asparagus Salad

Asparagus Salad

We then preheated the BBQ for almost 20 minutes to get it up to 500° so we could cook the lasagna sheets and asparagus as well as melt the cheese.

Open Faced Lasagne with melted cheese and asparagus

Open Faced Lasagne with melted cheese and asparagus

The end result was a beautiful looking meal, but one that I will never make again. Very bland although we can see a number of alternative toppings to use on the grilled lasagna sheets.

The assembled meal, looks beautiful but tasted bland

The assembled meal, looks beautiful but tasted bland

Of course after so much work, we were feeling fairly down. However earlier in the day we had made both home made Vanilla Ice Cream (thank you David Lebovitz for the wonderful cook book “The Perfect Scoop”) and Rose Levy Beranbaum’s Chocolate Oblivion Truffle Torte from Food 52. Thankfully, chocolate and vanilla ice cream can save just about any down day!

Rose Levy Beranbaum’s Chocolate Oblivion Truffle Torte with Home Made Vanilla Ice Cream

Rose Levy Beranbaum’s Chocolate Oblivion Truffle Torte with Home Made Vanilla Ice Cream